Preparing the bones
Bringing Elliot and Mary back to life
Bringing Elliot and Mary back to life is a long and careful process, involving many steps and many people. The stages involved in bringing their bones from the pit to public display are shown below.
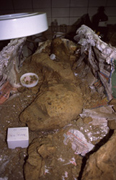
1. After it is located in the pit, each bone is carefully cleaned and its surface stabilised with acrylic plastic dissolved in acetone.

2. Several layers of newspaper and hessian soaked in plaster are then applied over the bone, which has been pedestalled by digging a narrow trench around it. This allows the total mass of bone and matrix to later be undercut and removed. The completed jacket will protect the bone during transport back to the laboratory.

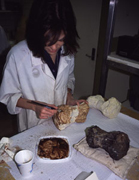
3. Back in the lab the plaster jacket containing the bone is opened on one side. The sediment surrounding the bone is then removed using dental probes and brushes.
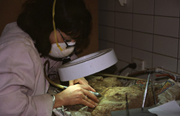
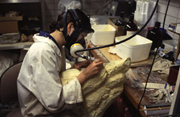
4. Bones from the Elliot site are often encrusted in a thick layer of hard ironstone. Here, Queensland Museum Senior Geosciences Technician Joanne Wilkinson is removing the encrustation using a hand-held pneumatic chisel. As the bone is gradually exposed, additional soluble acrylic plastic is applied in order to further harden it. Any major brakes are usually glued together with epoxy-resin glue. The process of removing the ironstone encrustation from each bone may take up to one or two months.
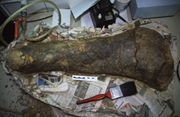
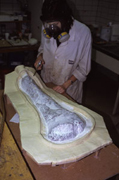
5. The fully prepared bone (in this case Mary's right tibia) is ready for moulding and casting.
Why make casts of fossils?
The main reason for creating casts is to protect the original bones. Fossils are often very heavy and fragile, whereas casts are lighter and easier to move around. They are therefore particularly useful for scientific study and public display.
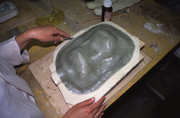
6. The first phase of moulding and casting usually involves creating a wooden base and plasticine wall around the bone. Several layers of silicone rubber are then applied to the surface of the bone. Former Queensland Museum Geosciences Technician Angela Hatch is shown here using compressed air to force the silicone in to all the bone's features.
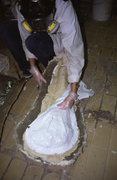
7. When the silicone has set, fibreglass or plaster is applied over the surface to form a hard jacket. The mould is then flipped over and the entire process is repeated for the other side. The bone is then removed and the two pieces of the mould are tightly screwed together so that expanding polyurethane foam can be poured in.
8. When the foam has set, the two halves of the mould (the fibre-glass and silicon rubber) are carefully removed.
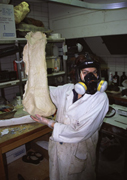
9. Angela holds the new cast aloft, fresh from the mould.
10. Any excess foam is carefully removed using a special grinding tool.
11. After they have been cleaned, the casts are then ready for painting. Several washes of fast-drying oil paint are applied to the surface until the desired effect is achieved.
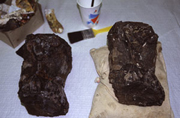
12. The completed replica (left) ? in this case, part of a thoracic vertebra ? next the original (right) ready to be sent off to Winton for display in the Australian Age of Dinosaurs interpretive centre.